Gallery Uploading For Mac Users
From Antiflux Wiki
Contents |
Introduction
One easy way to upload a bunch of pictures is to zip them up and upload this zip file to your home directory on antiflux. This is the first draft of this page and has not been carefully proof-read. If you find any factual errors or typos please fix them.
If you use iPhoto to organize your pictures you might be interested in using iPhotoToGallery instead of going the zip/scp route described below.
Ingredient List
- A bunch of pictures/movies
- A Mac OS X computer
- An antiflux account
- A gallery.antiflux.org account
- Secure FTP Client (e.g. Fugu)
Steps
Organize the Pictures/Movies you want to upload
Get the pictures and movies you want to upload off your camera and onto your computer. Organize your items into folders that will correspond to albums on gallery. Do not nest fodlers in these directories, this uploading method will not create albums for nested folders but instead take all the pictures from nested folders and put them at the top level of your destination gallery album.
An example is the folder pictures_to_upload with 4 pictures in it as seen in the image below.

Create a zip archive of the Pictures/Movies
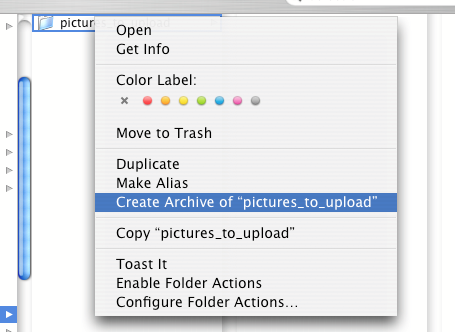
If you right-click (or press the control key and click if you only have one button) on the folder containting the pictures/movies you want to upload (pictures_to_upload in this example) you will see a contextual menu with a bunch of actions you can perform on the folder. You want to select the "Create Archive of ...." option which will create a zip file of the folder and place this zip file in the folder containing the folder you are archiving. The contextual menu is illustrated below:

Now you need to copy this zip file to the antiflux server.
Upload zip archive to antiflux.org
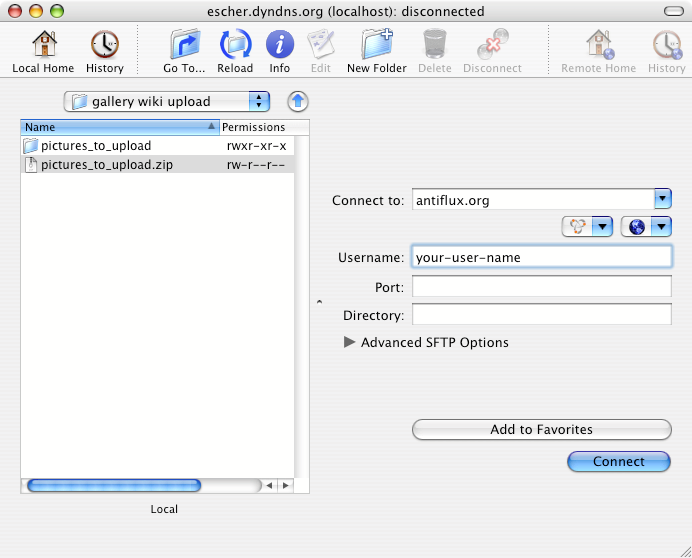
These instructions use Fugu, a secure ftp (sftp) client, to upload your newly created zip file to the antiflux server. The main window when Fugu is running is split into to parts, the left part is a view of the files on your computer, the right part is a view of the files on a remote server. Initially the left view will show the contents of your local home directory and the right view will have a connection dialog as illustrated here:

Enter antiflux.org in the "Connect to:" text entry field and enter your antiflux user name in the "Username:" entry field and click connect. You should be prompted for your antiflux password, this is your antiflux shell account password, which is the same as your email password and probably not the same as your gallery.antiflux.org password. If you connect sucessfully the right pane of the Fugu window will display a file listing of your antiflux home directory.
To upload the zip file created in the previous step you need to find the zip file in the left pane of the Fugu window. Once you have found the zip file in the left pane, which is on your computer, you need to find a good spot to put it in your antiflux home directory. If all you are going to use your antiflux home directory for is to upload pictures then you can just put the zip file straight into your home directory. If you feel like being a bit more organized then use the "New Folder" toolbar button to create a new folder and give it a descriptive name (gallery_pictures in this example). You should now have a Fugu window that looks something like this:

To copy the zip file of your pictures/movies created in the previous step drag it from the left Fugu pane to the right pane. This should display a progress meter as it uploads your pictures. Alternatively, if you have trouble finding the zip file you created from within Fugu, you can drag the zip file from the Finder onto the right pane of Fugu and this will send the file to the antiflux server as well. Once the file finishes uploading the Fugu window should look something like this:

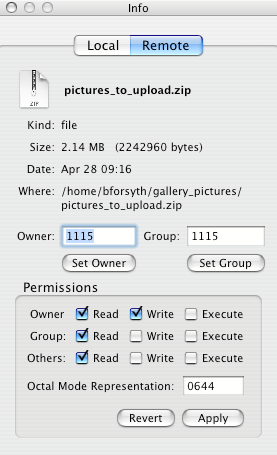
The final step is to ensure that the gallery program will be able to read your zip file. It needs to have global read access (and any containing folders need to have read access as well). This can be a bit complicated if you have never done it before but Fugu seems to create files and folders with global read access by default so you probably do not need to worry about it. But if you would like to double check things select the zip file you uploaded in the right Fugu pane and click on the "Info" toolbar button. This will pop up a file 'inspector' which should look a lot like this:

You want to make sure that the Read checkbox in the "Others:" row is checked.
Now you are ready to point gallery at your freshly uploaded zip file.
Point Gallery at the zip file
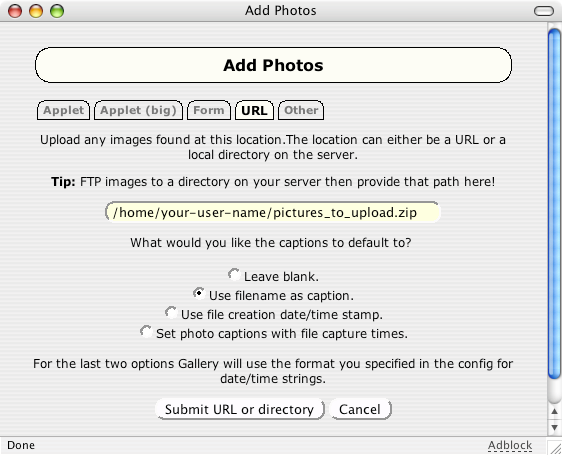
Log into your gallery.antiflux.org account and either find the album where you would like to put your new pictures/movies or create one. Once in your desired destination album select the "add photos" item from the "album actions" popup menu near the top of the page. A new browser window should pop up with a bunch of different options. You want to select the URL tab (should be second from the right). The URL you will specify in the entry field is the path to the zip file you uploaded to the antiflux server. Your home directory is located in /home/your-username so if you uploaded a zip file entitled pictures_to_upload.zip directly to your home directory you would enter something like this, "/home/your-username/pictures_to_upload.zip" replacing "your-username" with your actual username. It should look like this:

Click on the "Submit URL or directory" button and away you go! The window should have changed to a progress dialog which should go very quickly since all the pictures are already on the antiflux server now. When the upload is finished there should be a dismiss button in the progress window, click this and you are almost done.
The one last thing to do, assuming your upload was sucessful, is to delete the zip file from the antiflux server. Sinc the pictures are now in gallery you no longer need to keep the zip file around and deleting it will free up some space on antiflux. Go back to Fugu and select the zip file you uploaded in the right pane (the remote pane). Then click on teh delete toolbar button. A confirmation dialog box will appear, click on the Delete button to delete the zip file.
